Pages

Monday 25 February 2013

Vietnamese Ginger Chicken Hot Pot

 My brother was very fortunate to have been bought a day at Leiths Cooking School by his girlfriend, after much deliberating on how to spend this, he opted for a day of Vietnamese cooking. He came home with a new found love of simplistic, healthy and comforting Vietnamese dishes.

 This is the one we made for our family tradition of non-traditional Sunday dinner a few weeks back, it was a major winner all round. I love this kind of cooking, because all 3 Morrison children grabbed a chopping board and knife, having the prep done in minutes whilst wittering about the week's happenings, and then it all gets bunged in one pot, we crash down for a few minutes and come back and we have a perfect, rustic supper that has made the kitchen smell like an oasis of flavours; minimal effort and washing up, for maximum happiness, and no hours of agonizing waiting!

What's more, we fed 7 people for less than £10, on a dish that tastes much more expensive.


Ingredients

3cm ginger
2 Garlic gloves
1 White onion
1 medium red chili (more or less depending on your taste)
800ml chicken stock
500g Chicken thighs, boneless
2tbsp fish sauce
2tbsp brown sugar
Fresh Parsley


Method

Cut the ginger into long cuboid slithers, and finely slice the onion into crescent shapes, finely chop the garlic and chili and sweat in a glug of olive oil for 5 minutes on a medium heat.


Next, add the chicken thighs, stock, brown sugar and fish sauce, cover and simmer for 10-15 minutes, until the chicken is cooked.


Then sprinkle through some fresh chopped parsley. It's as simple as that.


We had ours with a dome of sticky rice and mopped up the left overs with some flat breads. It's pretty in its own, homely, hearty way.

Oooh, and it's oh, so scrummy.


Monday 4 February 2013

Good Hearty Supper: Minty Pea Soup and Rustic Bread


For me, a good supper hardly gets better than a rich warming soup and some homemade bread, what more could you wish for after a long day!?


For the Soup:
700g Garden Peas
200g cream cheese, Mascarpone works really nicely
Generous handful of Mint and Basil leaves
300-500ml Vegetable stock (I just used a stock cube to keep the process quick and simple)
a few handfuls of spinach for extra health bonuses
A dollop of creme fraiche for serving
Crispy slices of Parma Ham

Method

Defrost peas, add all other ingredients and blend in a processor or with a hand blender.  Soup at its most simple. Fry the parma ham until crisp and serve each bowl with a dollop of creme fraiche and a few rashers of the ham. Perfect!

For the Bread:
700g strong white bread flour
2 tsp salt
1 7g sachet fast action yeast
450ml luke warm water

Method:
Mix the flour salt and dried yeast into a bowl,make a well and pour in the water. Mix into a soft dough, of too stick add a little more flour. Take out of the bowl and start to knead on a lightly floured work surface, stretch the dough away from you and then fold in back towards yourself and press, then rotate slightly and repeat, this means that the dough gets well stretched.
Eventually the dough will start to feel pliable and springy, at this point return to the ball and cover the top with clingfilm. Leave to rise until doubled in size, about two hours.
Press the excess air out of the risen dough, this keeps the air holes in the bread smaller and more even, you can skip this if you want a more rustic loaf. Divide the dough into two, and shape into lovely round loaves. leave the loaves on baking parchment for about an hour, and they double up in size again.
Preheat the oven to 200 degrees C. Put two trays in the oven to preheat, these will help the base of the loaves crisp up, and but a tin at the bottom of the oven too.
Slash the top of the loaves once they have finished resting, transfer to the hot trays, and tip a cup of water into the tin at the bottom of the oven to let out a burst of steam. Bake for 15 minutes, turn around and bake for a further 15. The Loaves should sound hollow when you tap them from underneath, leave them on a wire rack to cool, or if you can't wait, then crack into that lovely warm bread with lashings of butter to help mop up the soup.
This is the kind of hearty warming meal to make you smile, and feel you have achieved something quite therapeutic when you have two golden loaves to share at the end. Bread needn't be as daunting as it seems to make!


Ultimate Original Chocolate Brownies


When I was at school, Chocolate Brownies became my 'thing' they were always present at the birthdays of my close friends, always requested, and then always always just expected to be there on their day, even on MY birthday, I was expected to make them for everyone
to share. (the sheer cheek of it!)
So I thought this was an appropriate recipe to start blogging with, as it very much is associated with me amongst my friends, yes and I do love them dearly, and I love making brownies, it wasn't all peer pressure.
Here it is, I much prefer hand written recipes so I'll include this, trying to give my blog a more homely touch, this recipe is pretty much 4 steps, 6 ingredients, simplicity is all that is needed.
Always bare in mind, you are making something with such delicious ingredients,
it's pretty hard to have an outcome that is not tastey even if you are not
happy with the look or texture, serve it up with icecream still warm and you
can't lose. Keep mindful of this, and you will be a happy baker!
Okay, now please enjoy these rather beautiful artisan-esque photos taken by a dear friend I'll call H,
who was being snap happy, as she is so talented at being, some time last year
when I was cheerily obliging to making brownies at her request.
The photos show, (right to left top row, right to left bottom row) chocolate
butter mix after melting, egg/sugar mix after whisking, (I did it with a hand
whisk here, hard work, takes a good 5 mins) adding the two together, adding the
flour/cocoa mix x2 and finally the mix sat in the baking tin.
Please enjoy, devour, share, eat warm wish lashings of cream or icecream, or leave to set and cool and chop up for gifts and celebrations, or just for sharing when someone looks in need of a Brownie!

February, moving forward.


Well, after a long Christmas holiday, greatly enjoyed by myself and my family, and a pleasant little whirl of parties, giggles, pajamas, food, cooking (mainly by me), playing and smiles, I can safely say we were so lucky as to have had a marvelous Christmas period, now alas, it is a new year, and time to upscale my little internet space (and that is a promise and resolution, I shall not disappoint on, on my new gooooooogle blog space!).
Here are some Christmas photographs,belated to reach this page I know, but my camera has been clicking away merrily, and I now have a massive store of recipe photos that can't wait to be shared.
So my resolution is: to blog blog blog and blog some more, and I hope and aim to keep you entertained along the way!
Here represents our Christmas day, I feel we need a good catch up. Sorry for the major overload of snaps.
Christmas 2012
If anyone would like their own drinking glasses, you can get them here at urban outfitters, along with mustaches and many many fun novelty gifts.
OH and guess where my Christmas Caviar came from? Lidl! Yes Lidl, do not put anything past Lidl, always worth a good explore.
The Truffle oil was one of a few lovely little gifts I bought my brother Ben, also seen in drinking glasses, from Amazon seller Truffle Hunter
Other little things i bought for fellow foodie Ben were from Taste Spice, and they went down a treat!
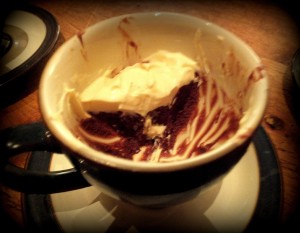
This was this our none traditional Christmas pudding to give everyone a bit more choice on after dinner sweets:
DSCF4251
That's a Flourless Chocolate Cake, deeeeeelish!
There were many more Christmassy times of significant fun, here are some photos I'd like to share:
DSC00597
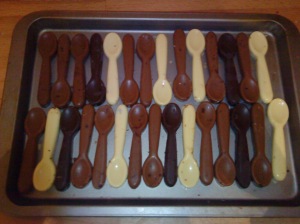
Chocolate spoons for the Christmas drinks party I helped my Land -lady pull together. SO sweet right?! Spoon moulds here, from Lakeland, a real nice novelty, good alternative to flakes for ice cream and to accompany puddings.
DSCF4380
DSCF4381
These are my finished Christmas hampers, more on these another day! I was very excited to hand these out though!
430781_10152351149165554_556047913_nA Christmas Ball, with wonderful friends, this picture summarizes our mood, a very umm merry one! (I promise you Spencer there on the end was happy too, Spencer SMILE!)
DSCF4118
A little bit of hosting with a gorgeous and most fabulous friend E, you can read her very clever blog here . We assembled and served canapes for a friend of mine, and then when the work was done, we kick and twirl-started the dancing in the kitchen, and let it continue through the whole house all evening long.
DSCF4675DSCF4669
Childish games involving lots of icing sugar cream and jelly babies and no hands at the Show Team Christmas party, here are my two 'adopted brothers' ...can never get them in the same photo, typical!
DSCF4391
A side saddle lesson was one of my lovely Christmas gifts, such a great thing to try!
393101_10151407263966563_968686836_n
I was lucky enough to bring in the new year with more gorgeous friends.
16775_10151189324669067_993687694_n
And one last photo, on returning home from the Canape party, having chats with Ollie, he loves to know all the party gossip.
So readers, we shall be seeing a great deal more of each other. To those who supported me by following and offering lovely comments in 2012, I thank you very much, in these early days especially they mean such a lot to me! I shall repay you with countless recipes and jovial chattering in 2013. I have very much enjoyed starting this blog, and I am teeming with ideas that could be of use and interest to my readers, and hopefully new readers too!
Looking forward to hearing from you.
Happy New Year all.

Friday 1 February 2013

Nifty Gift


I like to put lots of thought into presents, I like to get excited in a girly, fairy-god-motheresque kind of way. So last Sunday morning spent baking presents, wearing pj bottoms and a nice soft jumper, was as good as any morning is going to get for me.
I just made some basic cupcakes, I've tried a few recipes and decided . I hollowed out the middle with a gimmick product 'cupcake corer' which turned out to do the job quite nicely, and filled the middles with lemon curd and strawberry jam for extra delicousness. I was asked if these came from the Hummingbird Bakery so I suppose I can call that a job well done?! Topped them with butter-cream and put them in a pretty little cake box, this one I found in Morrisons if anyone is looking for some!
Also, great tip I picked up from The Great British Bake Off Masterclass, put cold butter in a jug with warm water and leave for a minute to soften, then drain and you have perfect, baking-ready butter instead!

Always invest in good jams and curd of not making your own(I shall be doing that soon!), they taste so much better, I think anyway. Plus the labels are prettier.

Basic vanilla cupcakes with extra filling and butter-cream: This makes 6-8 cupcakes, I use a muffin tray.
115g soft unsalted butter
115g caster sugar
2 eggs, beaten
115g self raising flour
1/4 tsp baking powder
1tbsp milk
1/2 tsp vanilla extract
1/2 tsp glycerin
Lemon curd
Strawberry jam (or any chosen fillings!)
Preheat oven to 180 degrees C, line your tray with pretty cupcake cases. Whisk the butter and sugar together with an electric whisk, when pale and fluffy add the egg a spoonful at a time with a spoonful of flour too, this stops it from curdling. Next sift in the rest of the flour into the mix, and the baking powder, then mix in the milk, glycerin and vanilla.  Spoon into cases and cook for about 15 mins, or until a knife inserted comes out clean. Cool on a wire rack. Once cool,  cut off any uneven parts of the cupcake, so you have a flat surface to ice onto (eat these bits!) use the cupcake corer, twist it in until about a 3rd deep, then twist back up again, be gentle and it will work. Then fill with chosen super tasty treats.
For the butter cream:
250g unsalted butter
250g sifted icing sugar
1-2 tbsp of chosen flavor, i used 2 tbsp of lemon juice, and 1 tbsp of strawberry jam after splitting the mix. Then, just a dot of food coloring.
Cream the soft butter and sugar together with the liquid. Then either pipe or spread into mounds on the cupcakes. Top with a little extra decor if you like.

I love making birthday cards too, as you can see, they don't need to take hours of labor,  and can be simple designs done whilst watching Sunday Brunch. I used a water soluble pen to write with, and then added shadows with a fine paint brush dabbed with water.
The yellow have grated lemon zest atop, and sliced strawberries on the pink ones. A heavy dusting of icing sugar for finishing makes the butter-cream dry to the touch.
How happy to these little beauties make you? Pro-looking cakes, affordable and simple, to make a perfect gift!

Monday 21 January 2013

Chocolate Black Pudding


I watched a version of this Italian pudding being made earlier in the week, when working as a bit of a wing-man at the cooking demonstration. So I owe it to L for introducing me to the idea, this recipe however, I improvised, and it was decided it was more like black pudding in looks than Salami as it is usually called.
It is still very fitting with my super quick dinner theme of tonight, and tastes oooohhh so good! Really, you can't go wrong.
Ingredients

200g Dark Chocolate
200ml double cream
250g digestive biscuits, crushed
2 Crunchie bars
handful of Pecans
anything else you fancy, I wanted to put in glace cherries, but not all of my family would have agreed! But personally I feel it would benefit even more from something chewy.

Method
Melt your chocolate, stir in the cream, tip in the dry ingredients, mixy mixy, then tip first onto grease-proof paper and wrap up into a sausage shape, then cover in tin foil. March it to the freezer and leave it for a couple of hours, take it out 20 mins before serving like you would with ice-cream, dust with icing sugar and slice up into little black puddings. Looks a treat, tastes a treat, couldn't be more simple to make! Would be great to make with whatever was in the cupboard and leave in the freezer for an emergency pudding. For something really sweet you could put popping candy in or on top before serving...wished I had had some lying around!
Anyway, enjoy!

Chocolate Mousse and Orange Shortbread Hearts


To put it most simply, this dessert received an almost record number of 'mmmmmmmmmmm's from everyone, prepared ahead of time, effortless to both make and serve, and tastes just so...mmmmm.
This is perfect for when you are having guests over. I am a believer in getting the best tastes in the simplest ways, after all, we are busy people, things to do, people to see, baking needs to be efficient , and as much as I love endless hours in the kitchen (and I really really do!) you don't always have the time. This is a good effective bake, needs very little washing up through minimal bowl usage, and so it really isn't daunting in the slightest.

DSCF4976DSCF4980

Ingredients for the Mousse
200g good quality dark chocolate
4 large free range eggs, separated
1 tablespoon caster sugar
Whipped vanilla cream to serve (add vanilla seeds to double cream and whip to make your own)

Method
Melt the chocolate gently, and in a separate bowl whisk the egg whites into soft peaks, add the sugar, and continue to whip into stiff peaks whilst waiting for the chocolate. Next, remove the chocolate from the heat and stir in the egg yolks one at a time, at first it looks like it will seize, but it doesn't, have faith. Add a spoonful of the egg whites to the chocolate, and fold gently with a metal spoon, this will help to soften the mixture, then add the rest of the egg whites in 3 batches, again folding gently so not to remove the air. Spoon the mixture into your chosen vessel and place in the fridge to set for at least an hour. Top with the cream and prepare to serve!
DSCF4982
Happy little pudding lovers! Ben has a spot on his nose to match his jumper...
DSCF4993
It was hard to keep Alice's pudding still to take a picture, I ate mine too quickly so had to borrow hers to show you the mousse...
DSCF4987
Yep, this was the only state that I could photograph my own pudding in!
Ingredients for the Shortbread
125g caster sugar
225g unsalted butter
300g plain flour
50g ground rice
The zest of 6 satsumas, or 3 oranges, think generous here, you want lots of lovely flavour.
Method
Cream together the butter and sugar, then tip in the flour and ground rice, rub with your fingertips like you are making a crumble, so that it becomes very well mixed. Then, combine the breadcrumbs and kneed gently to form a good pliable but stiff dough. Either roll and shape, or push into your moulds.  It is best here to chill for half an hour, but if you impatient like me you will survive if you put it straight in the oven.
Bake at 180 degrees C for about 15 minutes. If you can, get the shortbread out the oven whilst it has barely  any colouring, they will still feel quite soft, but this is the best way to get a nice crumbly biscuit with just enough of a bite.  Transfer to a cooling rack once you can push them out of the moulds, and dust liberally with caster sugar. They keep well in an airtight container, but ours never make it to needing to keep...
christmas blogging

I loooove silicone moulds now, I am officially a total convert! Lakeland, you are a haven!
Enjoy everyone.